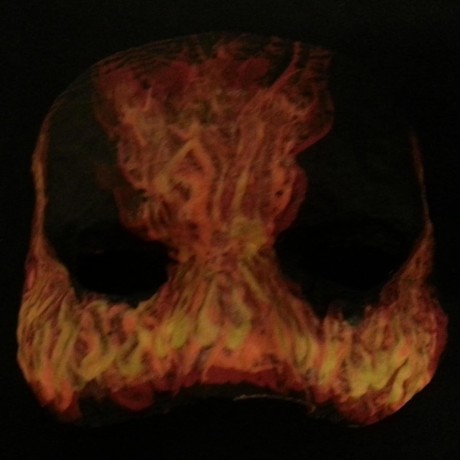

I still have no idea what I’m doing really. Just too determined to give up I guess, and it’s been such fun. Anyway I made a guitar pedal light switch cover. Still a lot of work to do, and every time I look at FreeCAD the wrong way, the model breaks, but it’s been a fun experience nonetheless.
On a side note, anybody have any idea why the face of the model is rough textured, while the foot switch on the lower half is flawless?

If you can get used to an open source tool like free cat, don’t let anyone here dissuade you from it. Something to be aware of with the closed source tools is that at any moment they can take them away. CAD tools like that are super expensive if there isn’t a free plan, and there’s every reason to believe that someday the free plan will go away.
I haven’t been able to wrap my head around freak out because just not that smart, but that doesn’t mean I don’t realize tinkercad can go away at any moment. It metaphorically keeps me up at night.
It appears that you need to get the nozzle closer to the print bed. You shouldn’t have gaps between the lines like the rough side. Also, check the slicer settings to make sure it’s doing several top layers/walls.
Please forgive my rudimentary knowledge here, but if it was a z height issue, wouldn’t it affect the bottom part of the print where it’s nice and smooth as well? I clean and level between every print, and the corners seem to be very snug at least using the paper method. It’s just enough clearance that I can still push and pull the paper without it catching on the nozzle
For one thing, the paper method only gets you so close. I find you actually have to watch your first layer go down and adjust that way. If you have a Prusa, there is a menu where you can make adjustments as it’s printing and it has a first layer calibration tool built in.
Second, check the slicer and see what it’s calling the very top layer vs what it’s calling the part that looks messed up. I’m willing to bet that the clean looking part is called top layer, whereas the messed up part isn’t. Prusa slicer ads additional material when it knows that it’s the very top of a print so that it looks better.
Either that, or is say you had a clog which caused under extension, but that may have worked out by the end of your print.
Thanks, i’ll check those things. Sadly, I don’t (yet lol) have a Prusa, only an Ender 3 pro. According to Prusa slicer, it’s all top solid infill. Here is the STL file if anyone is more of an expert at prusa slicer than I. https://www.printables.com/model/700351-guitar-pedal-light-switch/files
What slicer are you using?
Also was the clean part attached to the bed or do you have ironing turned in on the slicer?
I’m using Prusa slicer. I don’t think I have ironing turned on, but I’ll double check
Did you print the foot switch upside down and then flip it? If so, how does its other side look?
I can’t tell how the surface quality is by the knobs.
Your “main” top surface looks like under-extrusion.
It’s all a single part, so that’s how it printed. I have a sneaking suspicion it’s because of how I did the steps in free CAD, not having a clue what I was doing, etc. before I pass any judgment, I’m going to print other files and see if the issue persists. I’m already planning to rebuild the entire thing in free CAD again, using what I’ve learned in the process
Seems to be underextruded a bit.
Probably something to do with temperature or your nozzle being slightly clogged.
See if you have the setting for “ironing” turned on in your slicer.
Thanks, everyone seems to agree on the under extrusion bit, so that definitely seems like what it is. I’m pulling my hair out trying to figure out exactly what. I may look at the e steps next. Ironing is not turned on, and I just cleaned the nozzle.
Before you go through a bunch of calibration, I’d see if it happens with a different filament. Those black particles there are likely something with a higher melting point than the surrounding PLA, otherwise they’d “smear” during printing. I’m betting you’re hitting some intermittent clogs. See if the problem happens with a single color filament.
Thanks, I hadn’t considered what made the marble in this marble white. I noticed this with my previous filament as well. This was a dual color PLA with under extrusion issues. I still use the original plastic extruder, and I bought it second hand, so no idea how much wear is on that arm but it’s been in use for several years at least. I ordered an aluminum upgraded one and a filament dryer, and they should be here tomorrow. I’ll upgrade the extruder, dry the filament, and check esteps afterwards to see if that was my part of the under extrusion.

New Lemmy Post: One month ago, I didn’t really know what 3D printing was. Yesterday, I designed in FreeCAD my first model and printed it. What an amazing experience. (https://lemmy.world/post/10186306)
Tagging: #3dprinting(Replying in the OP of this thread (NOT THIS BOT!) will appear as a comment in the lemmy discussion.)
I am a FOSS bot. Check my README: https://github.com/db0/lemmy-tagginator/blob/main/README.md